使用 TypeScript 开发 Node.js CLI
大约 2 分钟
前言
本文简单介绍如何使用 TypeScript 搭建 Node.js CLI 开发框架。
开发环境
- MacOS 12.6.8
- VSCode: 1.18.2
- Node.js: 16.19.0
- npm: 8.19.3
- TypeScript: 5.2.2
- ts-node: 10.9.1
- @types/node: 20.8.0
创建项目
通过 npm init 命令创建一个新的名为 hello 的 Node.js 项目,这将在 hello 根目录下创建一个 package.json 配置文件:
mkdir hello
cd hello
npm init -y // 使用 `-y` 选项保持默认参数
为支持 ES 模块,在 package.json 中增加 type 属性并传入 module:
{
+	"type": "module",
}
为了运行 CLI,在 package.json 中增加 bin 属性并传入入口文件:
{
+	"bin": "src/index.ts",
}
然后,需要安装 TypeScript、@types/node 以及 ts-node:
npm install -D typescript @types/node ts-node
此时,package.json 中的内容如下所示:
{
  "name": "hello",
  "version": "1.0.0",
  "description": "",
  "main": "index.js",
  "type": "module",
  "bin": "src/index.ts",
  "scripts": {
    "test": "echo \"Error: no test specified\" && exit 1"
  },
  "keywords": [],
  "author": "",
  "license": "ISC",
  "devDependencies": {
    "@types/node": "^20.8.0",
    "ts-node": "^10.9.1",
    "typescript": "^5.2.2"
  }
}
为了让项目使用 TypeScript 编译器编译,使用 npx tsc --init 命令创建一个 tsconfig.json 配置文件并配置默认的编译选项:
npx tsc --init
如下所示修改 tsconfig.json:
{
  "compilerOptions": {
    "strict": true,
    "target": "ES2022",
    "module": "ES2022",
    "sourceMap": false,
    "esModuleInterop": true,
    "moduleResolution": "Node",
  },
  "include": ["src/**/*.ts"],
  "ts-node": {
    "esm": true,
  }
}
创建入口文件
创建 package.json 中 bin 属性配置的 TypeScript 入口文件 src/index.ts,在文件的第一行添加以下 shebang:
#! /usr/bin/env npx ts-node
接下来为 src/index.ts 添加执行权限:
chmod u+x ./src/index.ts
然后在文件中添加一条输出:
console.log('Hello CLI');
文件完整内容如下:
#! /usr/bin/env npx ts-node

console.log('Hello CLI');
现在这个文件就可以执行了:
./src/index.ts
输出如下:
Hello CLI

全局命令
现在可以使用以下命令在本地全局安装 npm 包:
npm link
安装完成后,可以使用 package.json 中的项目名称执行:
hello
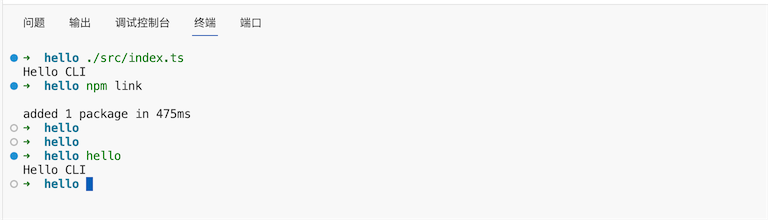
使用以下命令可以取消全局命令:
npm unlink -g hello
至此 Node.js CLI 框架搭建完成,可以编写业务逻辑代码了。